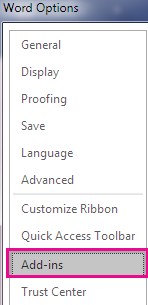
- Open an Office application, such as Word. Click File > Options > Add-ins > Manage: COM Add-ins (at the bottom) > Go.

- Do one of the following:
- If the check box for Adobe PDF is clear, select it, and click OK.

- If the check box for Adobe PDF is already selected, clear it, close the program, and then re-open it. Follow the path in step one, and then select the check box for Adobe PDF. Click OK.
Note: If enabling the Adobe PDF add-in doesn’t work, try uninstalling and then reinstalling Adobe Acrobat, and make sure that the Adobe PDF add-in is enabled in the Office application.
Navigate to the .dll file
Once you've ensured that you have the latest version of Office 2016, you can activate the Adobe Acrobat add-in by navigating to its .dll file.
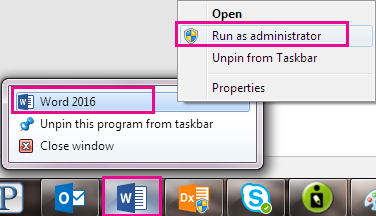
- From the Start Menu or the taskbar, right-click Word.
- From the right-click menu, right-click the Word program, and click Run as administrator.
- Open a new blank document.
- Go to File> Options > Add-Ins > Manage: COM Add-Ins, and then click Go.
- Select the check box for Acrobat PDFMaker Office COM Addin, and then click Remove.

- Click Add, and navigate to C:\Program Files (x86)\Adobe\Acrobat DC\PDFMaker\Office\PDFMOfficeAddin.dll.
- Close Word, and then open it again. The Adobe Acrobat tab should now appear.


No comments:
Post a Comment